3.1.1. Conceptual overview#
3.1.1.1. About this tutorial#
This tutorial addresses how to process payments using the GNU Taler merchant Backend. The audience for this tutorial are developers of merchants (such as Web shops) that are working on integrating GNU Taler with the customer-facing Frontend and the staff-facing Backoffice.
This chapter explains some basic concepts. In the second chapter, you will learn how to do basic payments.
This version of the tutorial has examples for Python3. It uses the
requests library for HTTP requests. Versions for other
languages/environments are available as well.
If you want to look at some simple, running examples, check out these:
The essay merchant that sells single chapters of a book.
The donation page that accepts donations for software projects and gives donation receipts.
The WooCommerce plugin which is a comprehensive integration into a Web shop including the refund business process.
3.1.1.2. Architecture overview#
The Taler software stack for a merchant consists of the following main components:
A frontend which interacts with the customer’s browser. The frontend enables the customer to build a shopping cart and place an order. Upon payment, it triggers the respective business logic to satisfy the order. This component is not included with Taler, but rather assumed to exist at the merchant. This tutorial describes how to develop a Taler frontend.
A Taler-specific payment backend which makes it easy for the frontend to process financial transactions with Taler. For this tutorial, you will use a public sandbox backend. For production use, you must either set up your own backend or ask another person to do so for you.
The following image illustrates the various interactions of these key components:
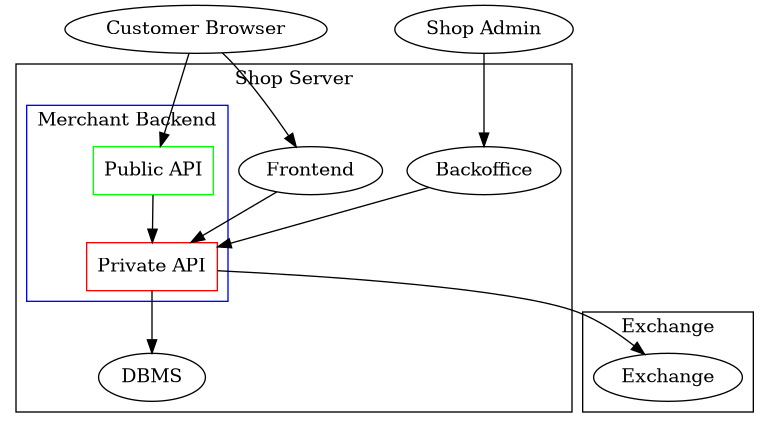
The backend provides the cryptographic protocol support, stores Taler-specific financial information and communicates with the GNU Taler exchange over the Internet. The frontend accesses the backend via a RESTful API. As a result, the frontend never has to directly communicate with the exchange, and also does not deal with sensitive data. In particular, the merchant’s signing keys and bank account information are encapsulated within the Taler backend.
Some functionality of the backend (the “public interface“) is exposed to the
customer’s browser directly. In the HTTP API, all private endpoints (for the
Backoffice) are prefixed with /private/. This tutorial focuses on the
/private/ endpoints. The public interface is directly used by the wallet
and not relevant for the merchant (other than that the API must be exposed).
3.1.1.3. Public Sandbox Backend and Authentication#
How the frontend authenticates to the Taler backend depends on the configuration. See Merchant Backend Operator Manual.
The public sandbox backend https://backend.demo.taler.net/instances/sandbox/
uses an API key in the Authorization header. The value of this header must
be Bearer secret-token:sandbox for the public sandbox backend.
>>> import requests
>>> requests.get("https://backend.demo.taler.net/instances/sandbox/private/orders",
...              headers={"Authorization": "Bearer secret-token:sandbox"})
<Response [200]>
If an HTTP status code other than 200 is returned, something went wrong. You should figure out what the problem is before continuing with this tutorial.
The sandbox backend https://backend.demo.taler.net/instances/sandbox/ uses
KUDOS as an imaginary currency. Coins denominated in KUDOS can be
withdrawn from https://bank.demo.taler.net/.
3.1.1.4. Merchant Instances#
A single Taler merchant backend server can be used by multiple
merchants that are separate business entities. Each of these separate
business entities is assigned a merchant instance which is identified by
an alphanumeric instance id. If the instance is omitted, the instance
id admin is assumed.
The following merchant instances are configured on https://backend.demo.taler.net/:
GNUnet(The GNUnet project), reachable at https://backend.demo.taler.net/instances/gnunet/FSF(The Free Software Foundation), reachable at https://backend.demo.taler.net/instances/fsf/Tor(The Tor Project), reachable at https://backend.demo.taler.net/instances/tor/admin(Kudos Inc.), reachable at https://backend.demo.taler.net/sandbox(for testing.), reachable at https://backend.demo.taler.net/instances/sandbox/
Note
These are fictional merchants used for our demonstrators and not affiliated with or officially approved by the respective projects.
All endpoints for instances offer the same API. Thus, which instance to be used is simply included in the base URL of the merchant backend.
3.1.1.5. Video tutorial#
This page contains all the documentation for the video tutorial introducing the Taler merchant API.
3.1.1.5.1. Video#
3.1.1.5.2. Requirements#
Required for this tutorial series:
- A Taler merchant backendFor convenience, we recommend you to use https://backend.demo.taler.net/instances/sandbox/.
- A Taler wallet instanceSetup instructions are available on https://wallet.taler.net, though not required for this tutorial.
- A REST API management software or relevant programming skillsIn this video series, we are going to use the Insomnia free software, available for download at https://insomnia.rest.As an introduction, this video will show how to export working code from your prepared queries in Insomnia in Python (or any supported language) and execute them, but this will not be demonstrated again in the next tutorials.
3.1.1.5.3. Demo backend notice#
Using the online Taler merchant demo service https://backend.demo.taler.net/instances/sandbox/ is strongly recommended for this tutorial.
The access key is: sandbox.
3.1.1.5.4. Information about the secret token#
The secret token is compliant with the RFC 8959 document. You can learn more about it here: https://datatracker.ietf.org/doc/html/rfc8959. Keep in mind that this is a Bearer token, and that your authoirization header needs to specify it.
Your authorization header should look like this:Authorization: Bearer secret-token:<access key>
3.1.1.5.5. More tutorials#
To view additional tutorials, you can browse this site or head to https://docs.taler.net to get the latest documentation about the Taler services.