2.4.2. インストールと設定#
LibEuFinコネクタモジュールをインストールする前に、銀行からのEBICSデータと、Dolibarrシステム上で動作するlibeufin-nexusのセットアップがすでにあることを確認してください。libeufin-nexus側については、GNU Taler Nexusマニュアル に従ってください。
2.4.2.1. 前提条件#
簡単に言うと、次のものが必要です:
Dolibarr v22以降
銀行からのEBICSアクセス/データ
ほとんどの場合、これで十分です。
さらに具体的には、libeufin-nexusもインストールする必要があります。そのためには、root権限が必要か、またはソースからlibeufinをインストールする方法を知っている必要があります。
幸いなことに、このモジュールにはシステム管理者がインストールをより簡単かつ迅速に行えるようにする手順もいくつか示されています。
もちろん、このモジュールを十分に活用するには、次のDolibarrモジュールを有効化することをお勧めします:
受注
仕入先
請求書
銀行と現金
スケジュールジョブ
2.4.2.2. LibEuFin-NexusとPostgreSQLのインストール#
くれぐれも、libeufinのインストール手順についてはTalerのドキュメントに従ってください: GNU Taler Nexusマニュアル 。
唯一必要な特別な作業は、Dolibarrを実行するロールを作成し、そのロールに``postgres:///libeufin-nexus``へのアクセス権を与えることです。この部分については、モジュールが次のコマンドを表示する場合があり、それを管理者と共有する必要があるかもしれません:
PostgreSQLセットアップ:
apt-get install postgresql postgresql-client
systemctl enable --now postgresql
PostgreSQLロールを作成します。これは、NexusのDBロールが存在しない場合に生成されます:
runuser -u postgres -- psql -tc 'SELECT 1 FROM pg_roles WHERE rolname = '\''<role>'\''' | grep -q 1 || runuser -u postgres -- createuser --no-superuser --no-createdb --no-createrole '<role>'
PostgreSQLデータベースを作成します。これは、NexusのDBデータベースが存在しない場合に生成されます:
runuser -u postgres -- psql -tc 'SELECT 1 FROM pg_database WHERE datname = '\''<database>'\''' | grep -q 1 || runuser -u postgres -- createdb --owner='<role>' '<database>'
診断で表示されるPostgreSQLプローブ:
psql '<postgres-connection-string>' -v ON_ERROR_STOP=1 -tAc "SELECT 1;"
この部分が完了したら、いよいよDolibarr内でのコネクタモジュールのインストールを確認できます。
2.4.2.3. LibEuFin Connectorのインストール#
インストールは非常に簡単です。GitHubリリース からモジュールの``.zip``を取得する必要があります。このモジュールは後で`DoliStore <https://www.dolistore.com/>`_ でも入手できるようになる予定なので、そちらのパッケージを使用することもできます。
モジュールを入手したら、Dolibarrに移動する必要があります。以下で、その方法を確認できます。同じ順序でボタンをタップするだけです。これは他のDolibarrカスタムモジュールと変わりません。
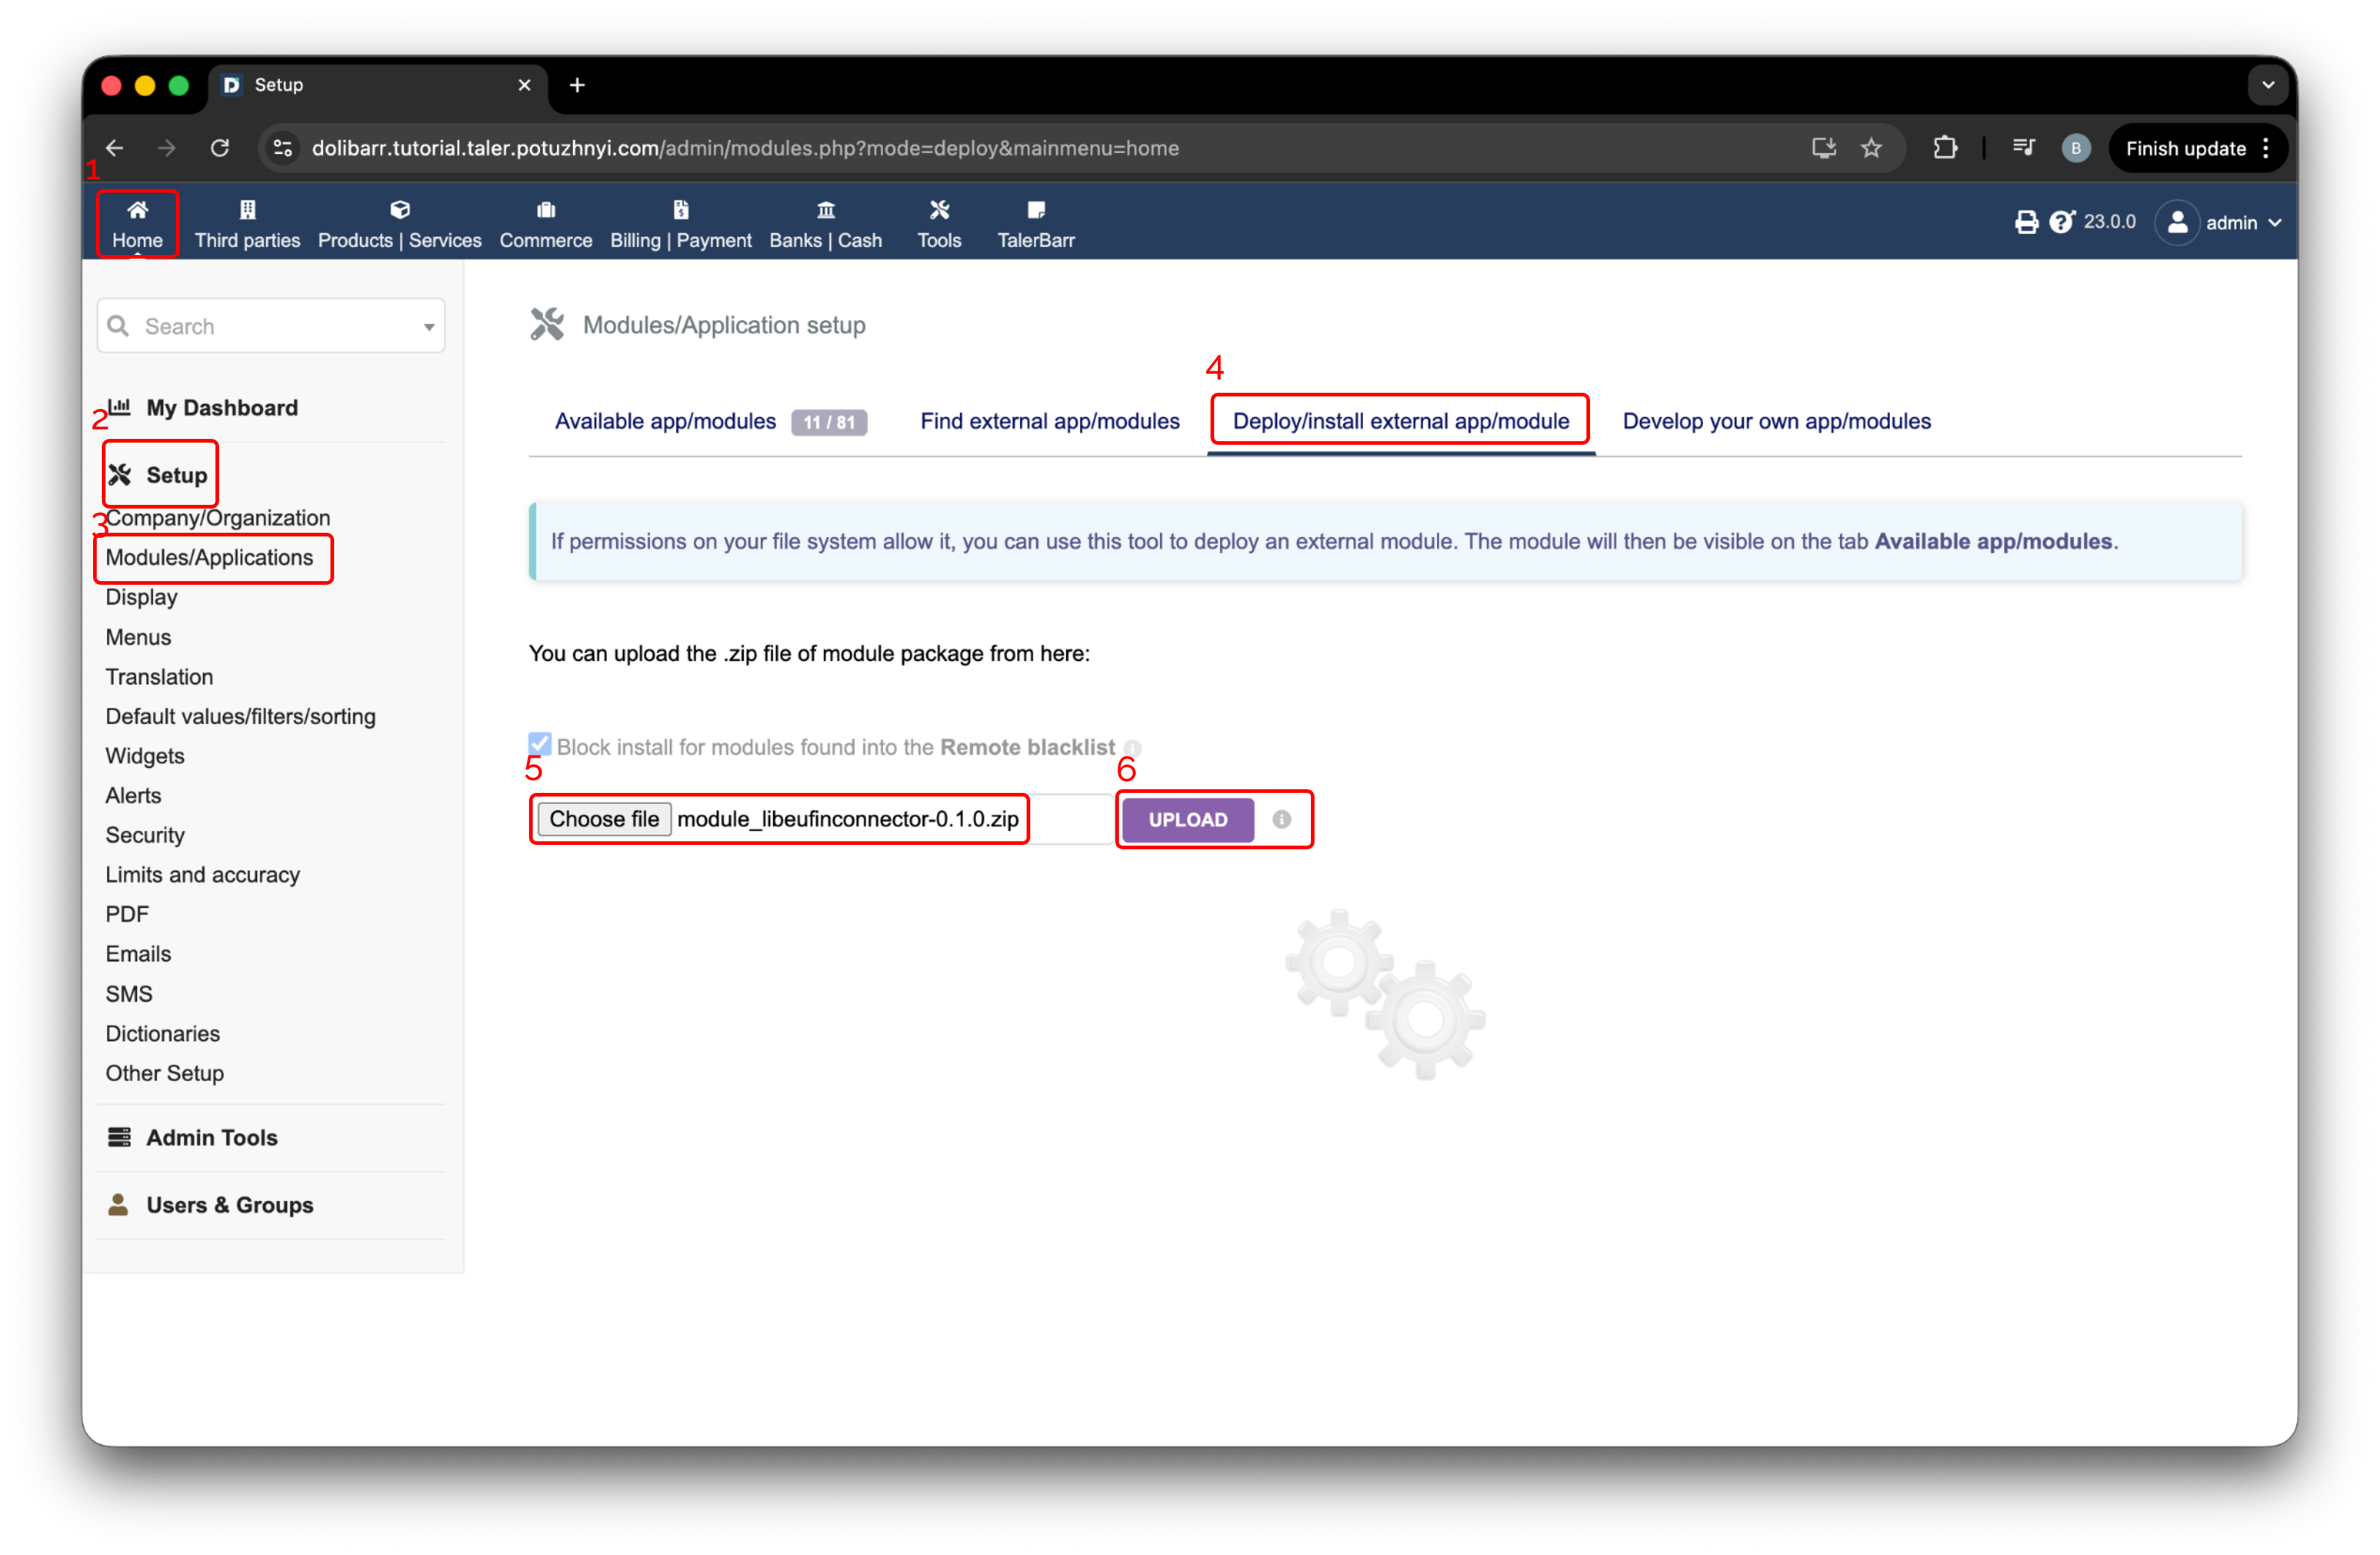
外部モジュールをインストールするためのDolibarrセットアップページ。#
表示されるバナー内のリンクをたどってください。場所については次の画像を確認してください。
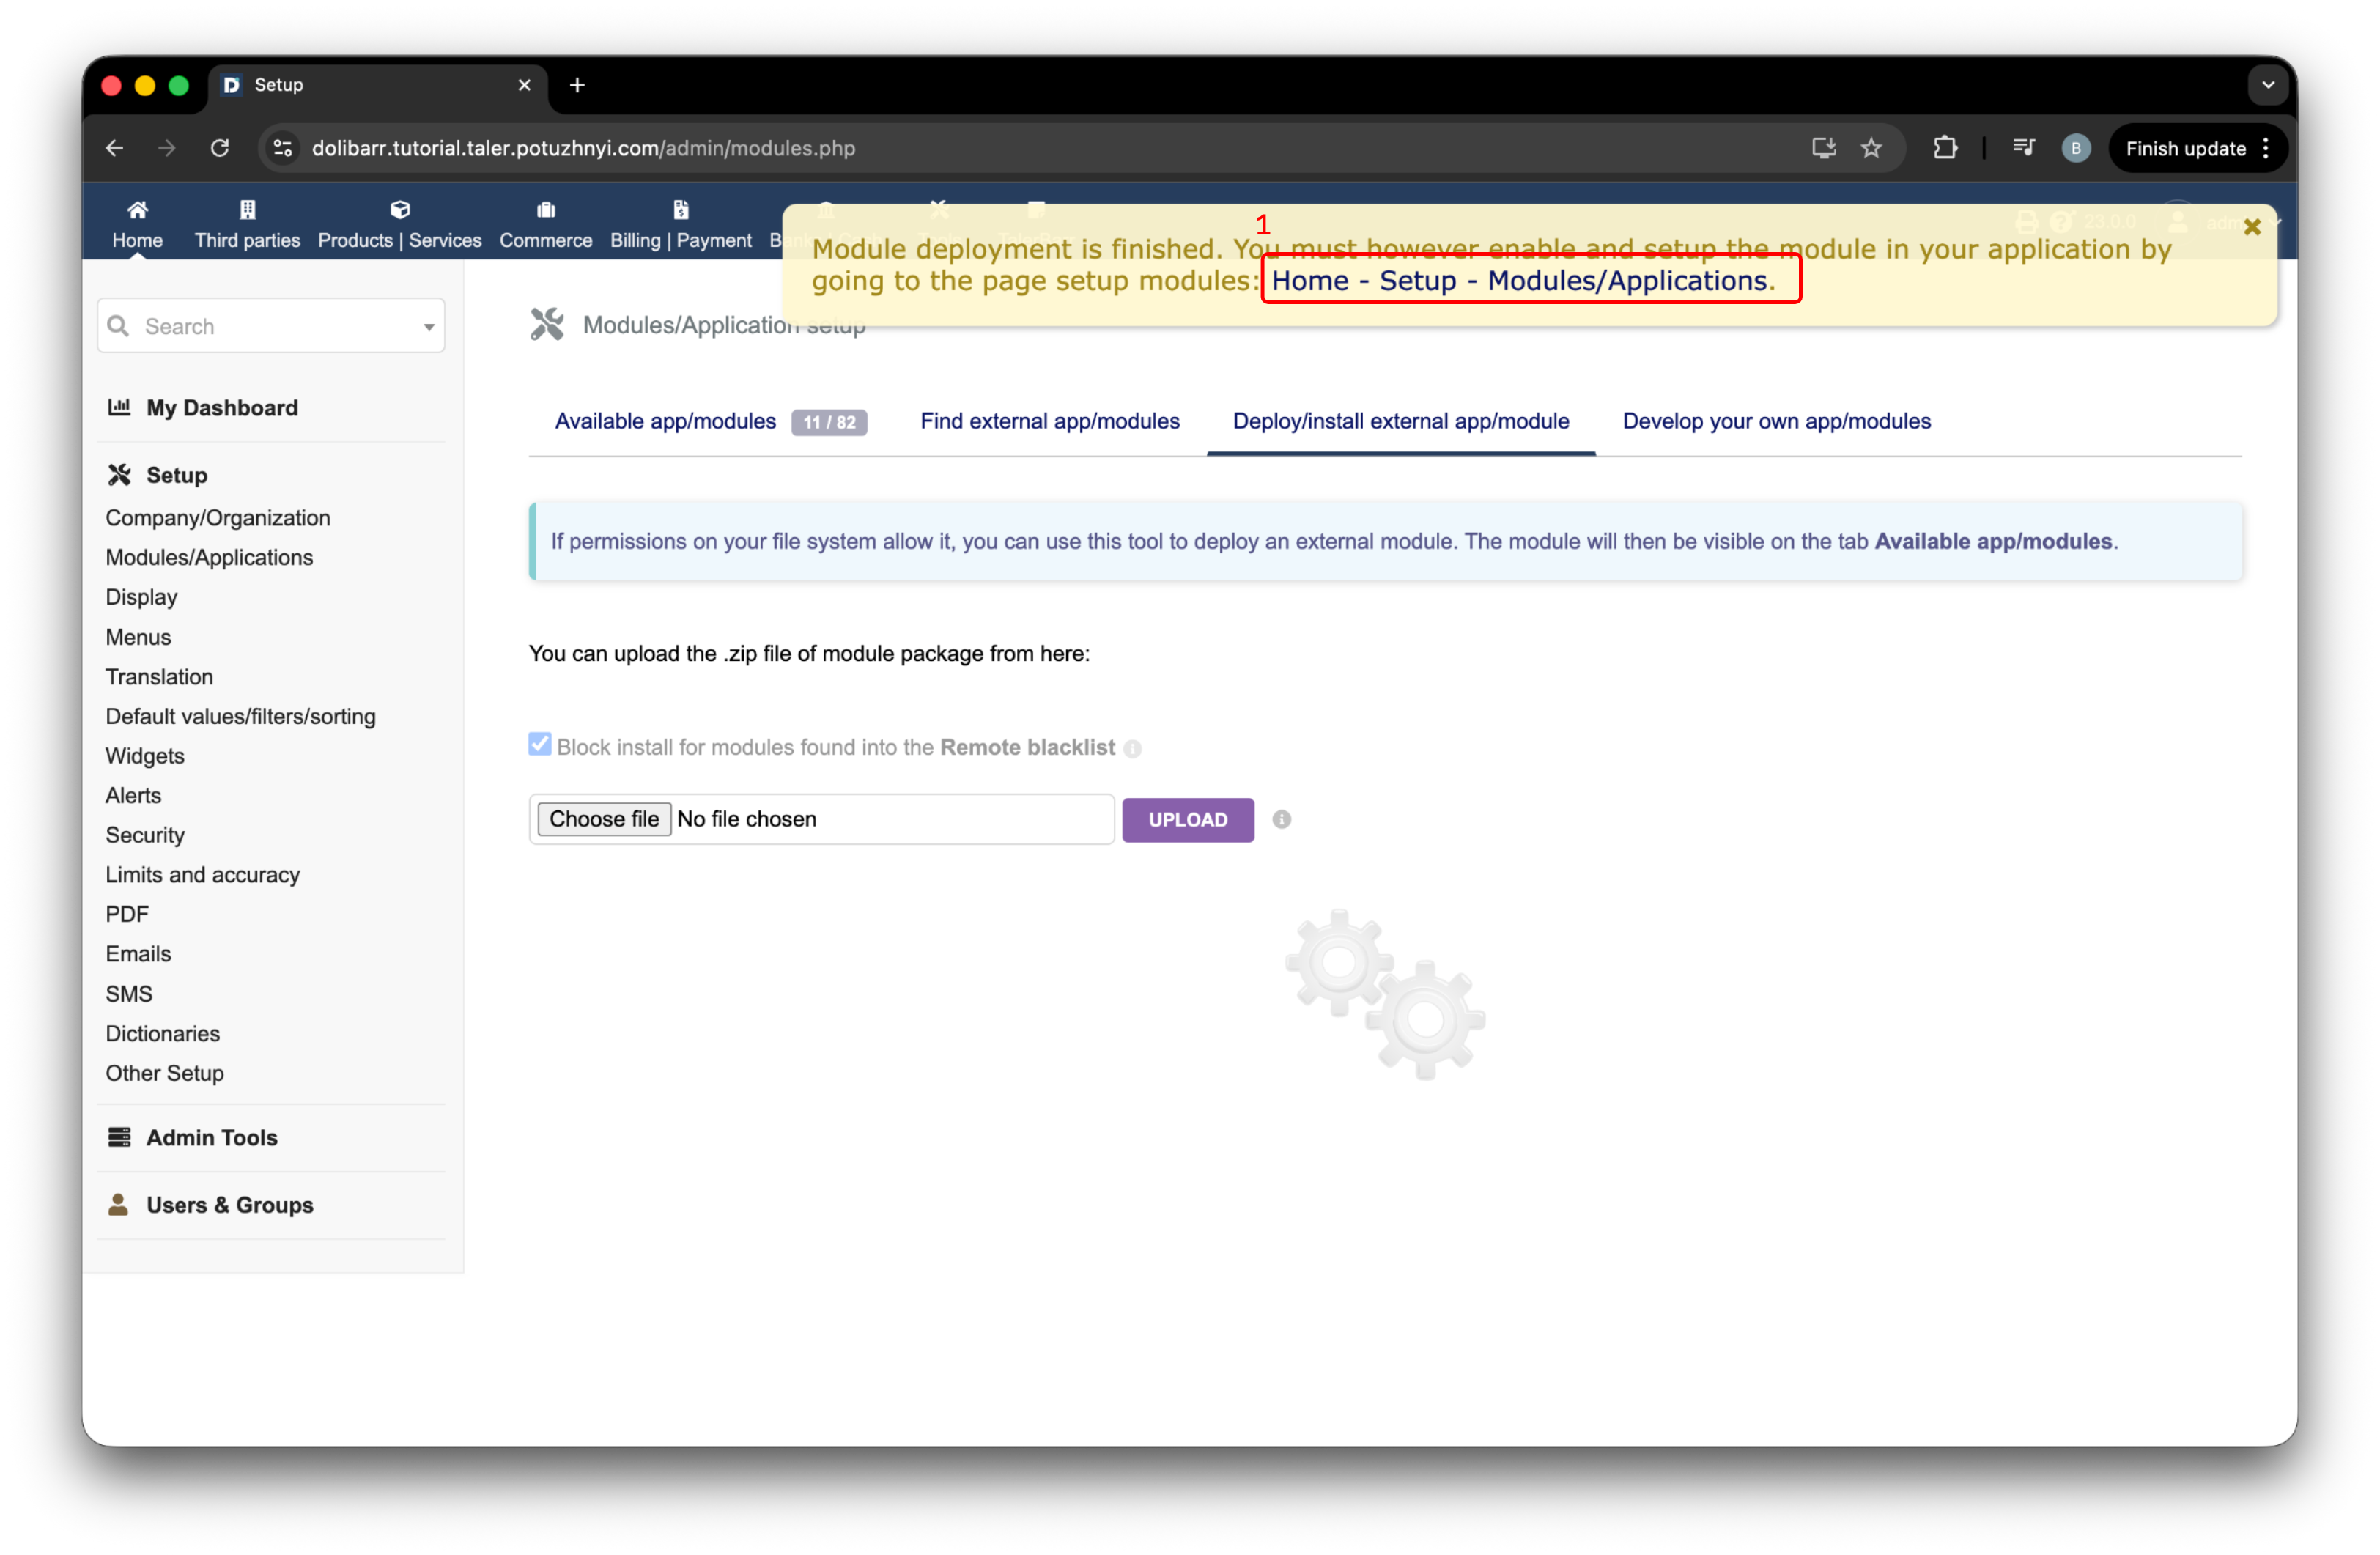
モジュールがデプロイされた後に表示されるDolibarrバナー。#
もちろん、モジュールを有効化する必要があります。ラベル1で示された領域が緑色のトグルになっていることを確認し、次に設定/歯車アイコンを押してください。これでモジュールのインストールに成功したので、続けて設定を行います。
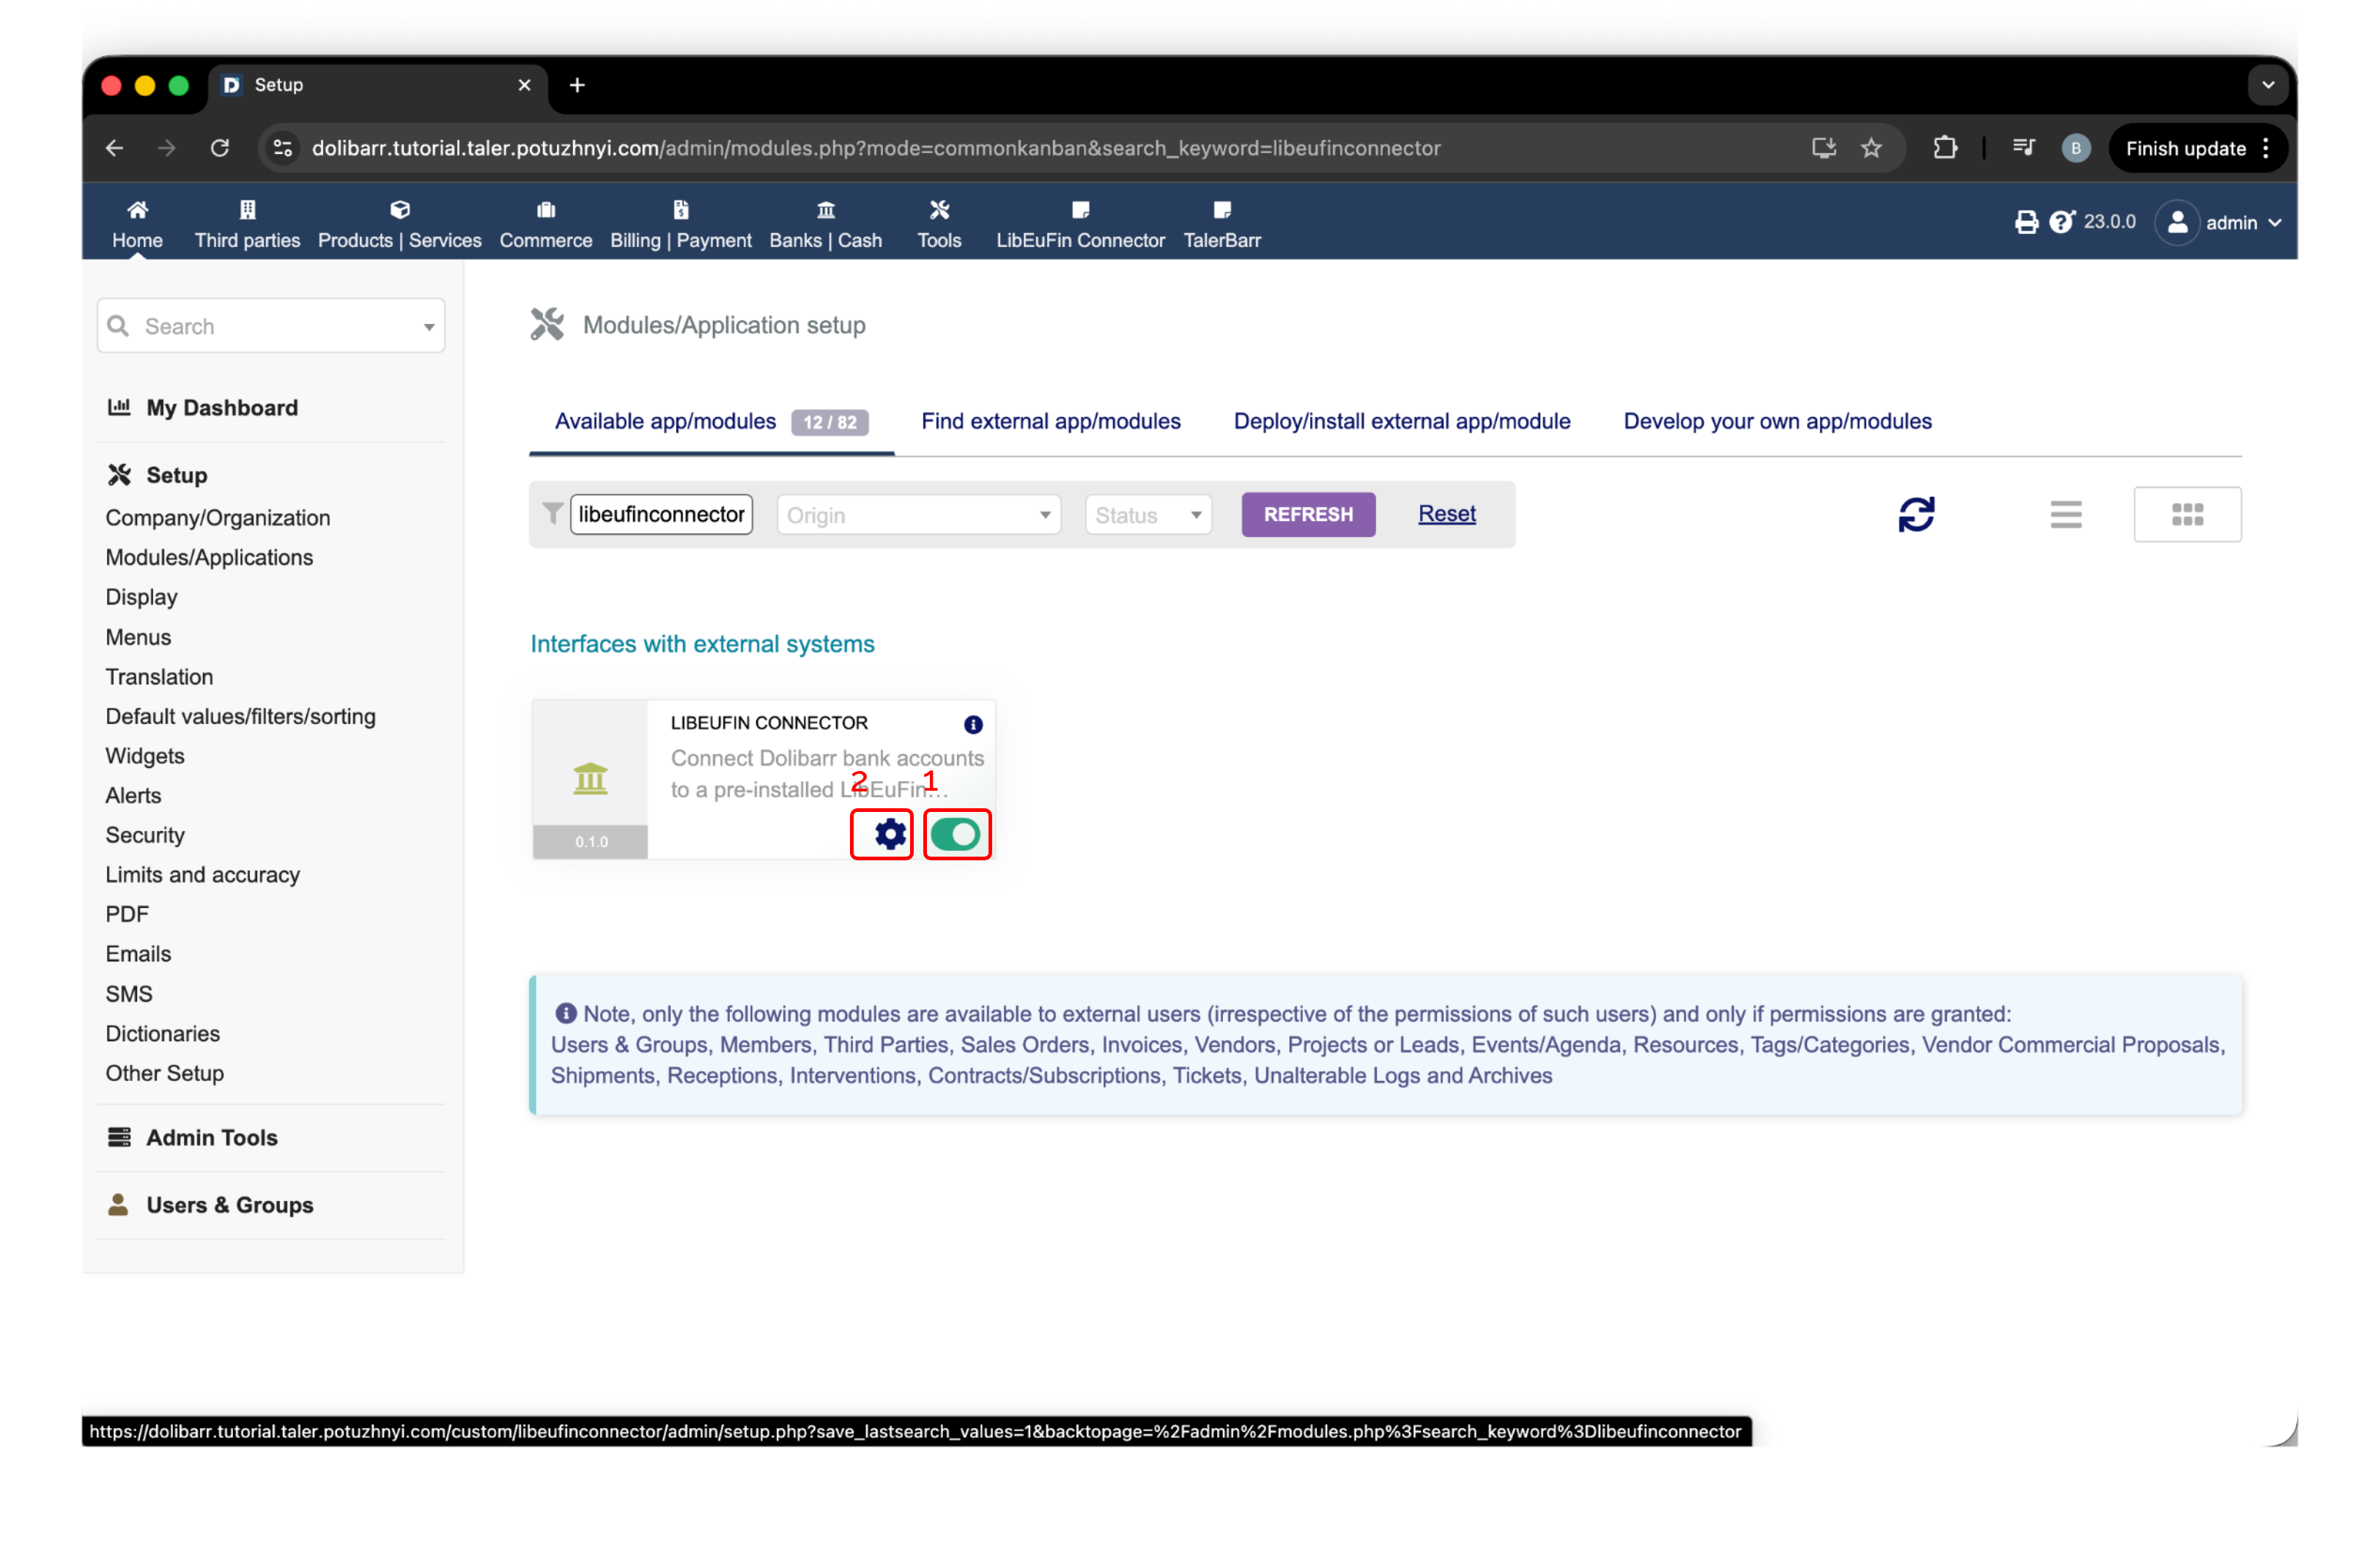
Dolibarr内のLibEuFinコネクタのアクティベーションおよび設定ボタン。#
2.4.2.4. LibEuFinコネクタの設定#
Dolibarrが動作するマシンにlibeufin-nexusをインストールしていない場合、モジュールがそれを検知し、インストールが必要であることを知らせるかわいい黄色のバナーを表示します。
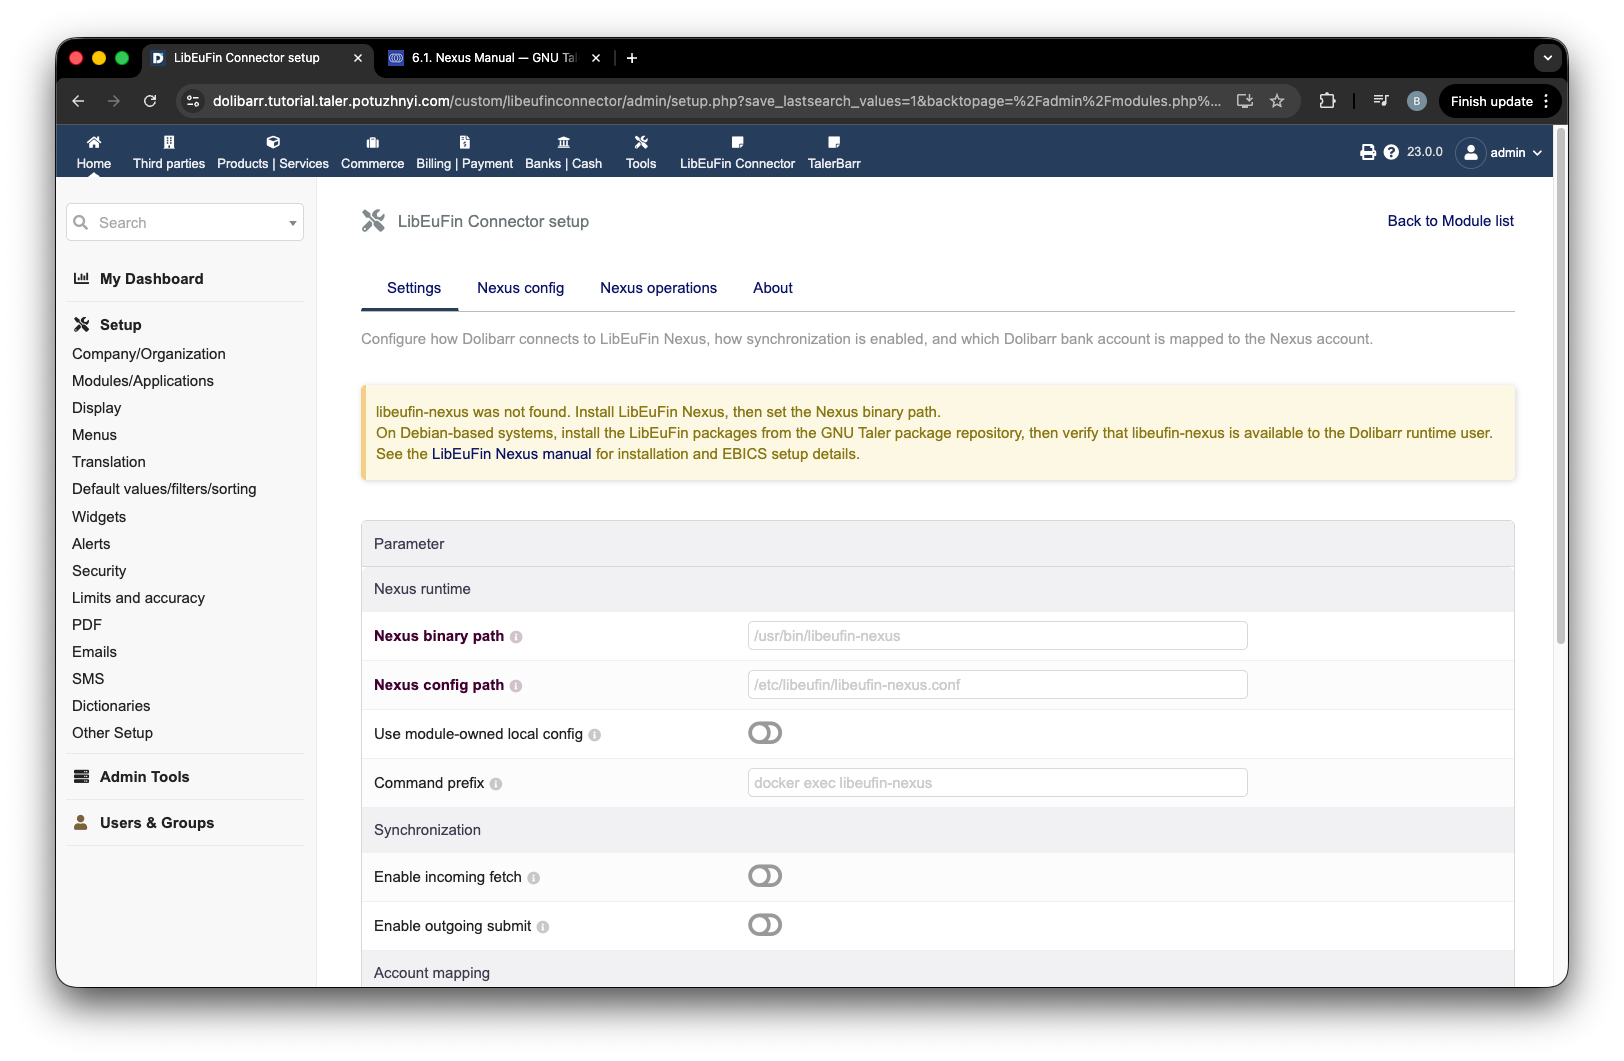
libeufin-nexusが見つからないことを警告する設定ページ。#
この小さな問題を解決すると、セットアップページを再読み込みできます。モジュールがモジュールパスを検知し、次の画像のようにここに表示します。次に、ラベル1の**Use module-owned local config**をtrueに設定することをお勧めします。そうでない場合は、Dolibarrを実行するユーザーが``Nexus config path``ファイルにアクセスできることを確認してください。
ラベル2と3は、モジュール内で入金取引と出金取引を表示するかどうかをフィルタリングするための選択肢にすぎません。
**Demo**ラベルは、文字通りデモを意味します。これにより特別な画面(デモ)が有効になり、主に次の2つのことができます:
偽の入金取引を作成する
実際のlibeufin-nexusがメモリ内に保持している内容を確認する
モジュールが動作することをテストし、本番環境のみで作業する予定になったら、必ずオフにしてください。灰色になっている必要があります。非管理者ユーザーがこれを表示するには許可を与えられる必要があるという事実による追加の保護もあります。とはいえ、入金を偽装することは本番システムにとって好ましくありません。
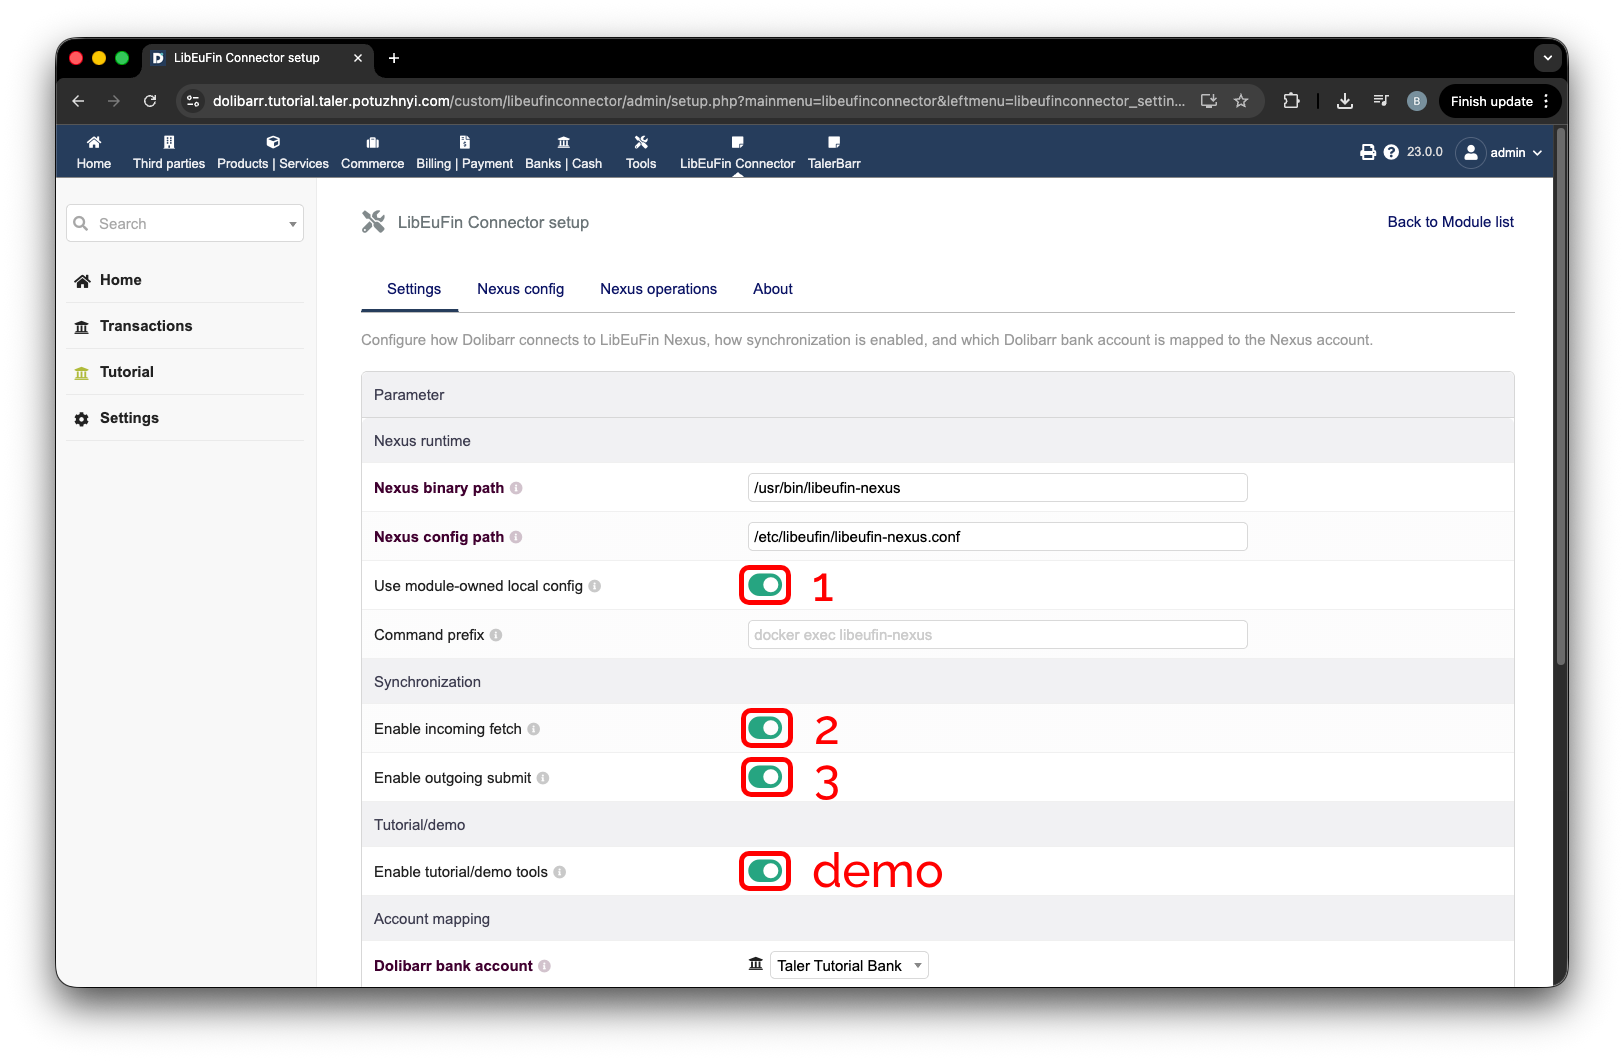
LibEuFinコネクタの主要設定。#
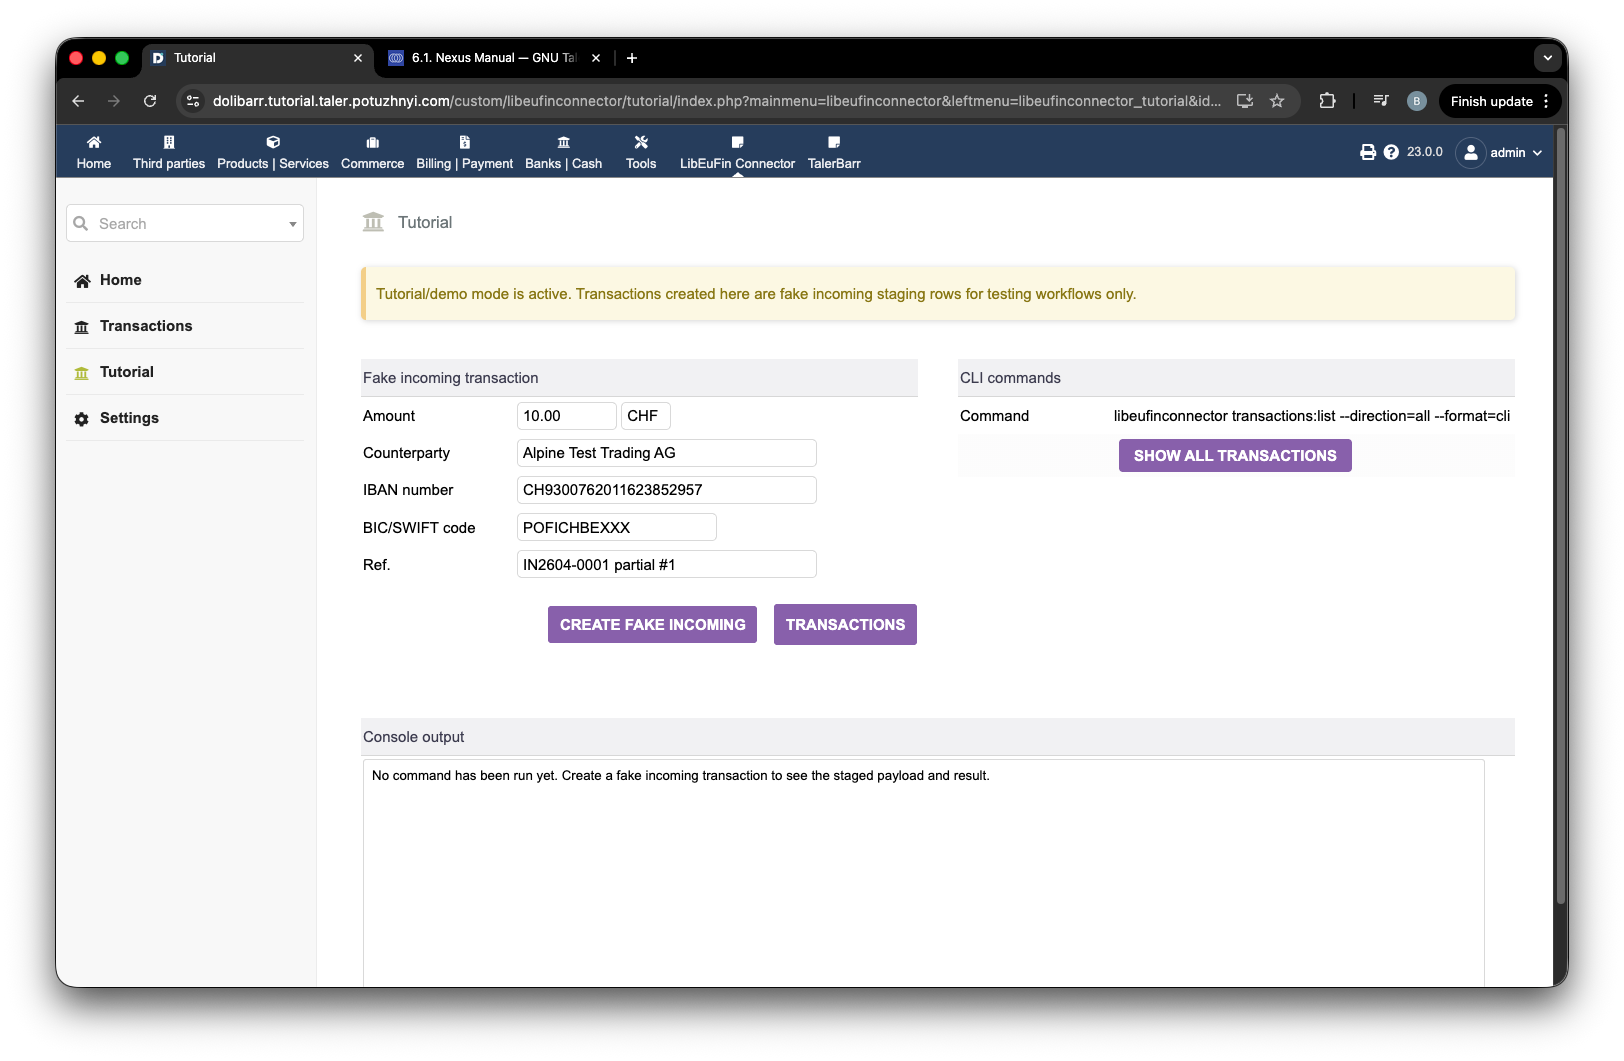
LibEuFinコネクタのデモ画面。#
最初の部分のすべての項目を確認したら、下にスクロールできます。ここで設定すべき主なことは、libeufinを有効化したい銀行口座です。理想的には、セレクターから銀行口座を選択すると、以前Dolibarrに入力したデータからすべてのデータが自動的に入力されます。例については次の画像を確認してください。すべての銀行の詳細を入力したら、ラベル2の保存ボタンを押すだけでモジュールの設定は完了ですが、システム全体の設定はまだ完了していません。
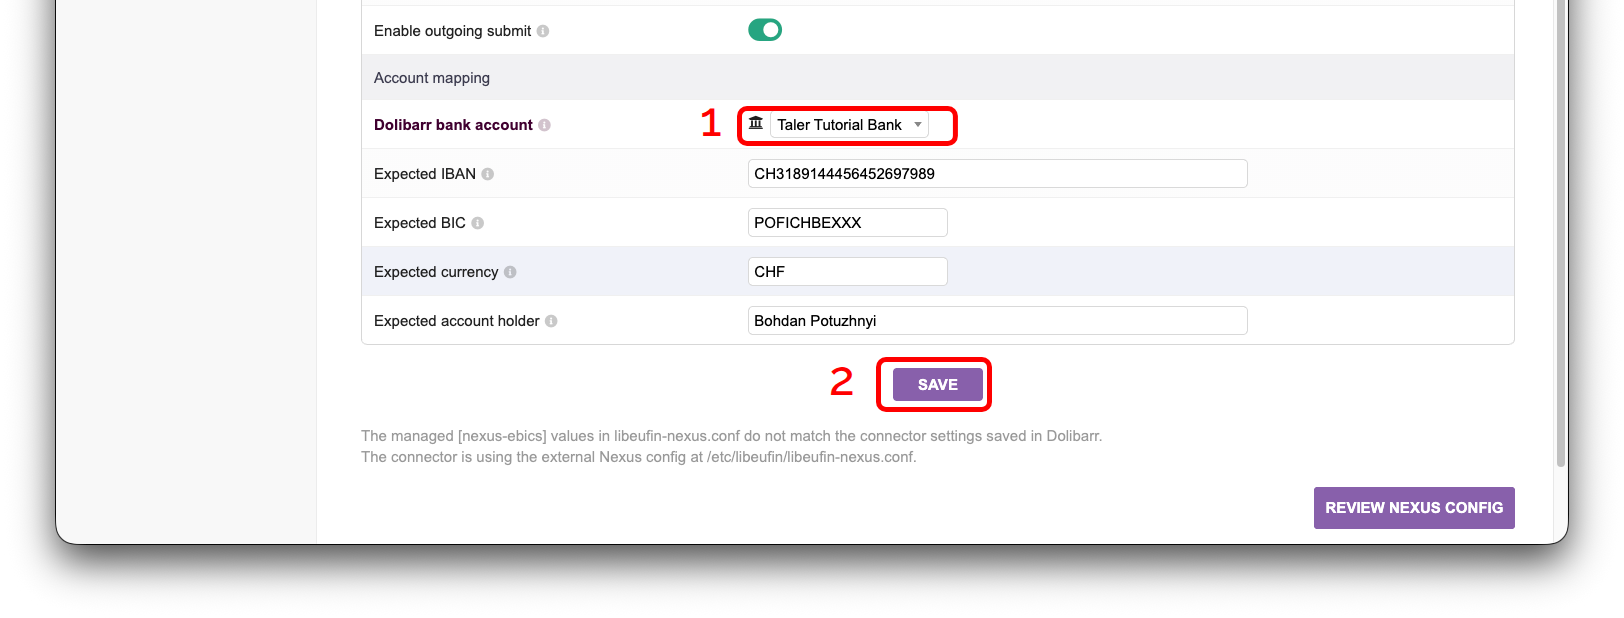
LibEuFinコネクタの銀行口座設定。#
次の画像に表示されるバナーからわかるように、これで設定がすべて完了したわけではありません。具体的には、次はlibeufin-nexusの設定ファイルを作成する必要があります。そのためには、ラベル1の**Nexus config**ボタンを押してください。
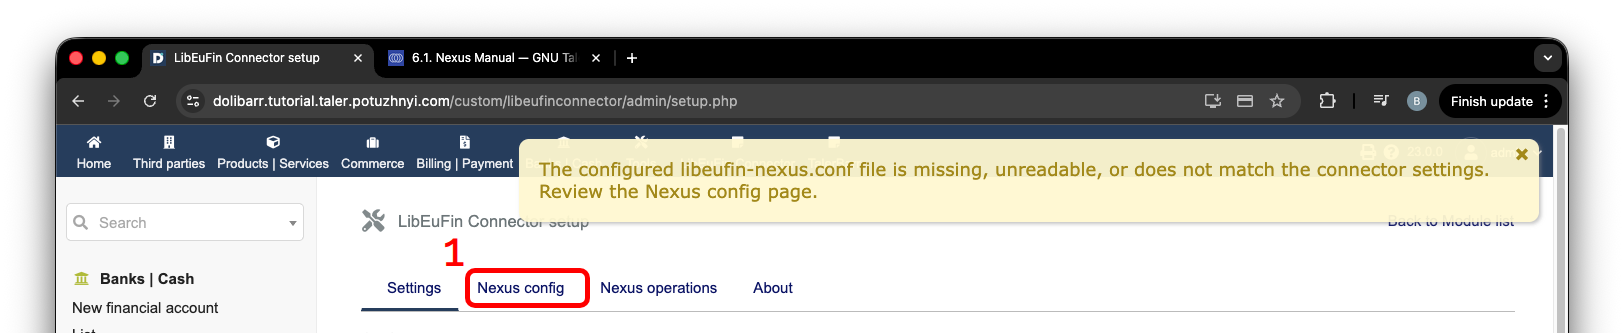
設定の警告とNexus configボタン。#
``Nexus config``ページに移動すると、次の画像のように、設定に問題があることを示す黄色いボックスがいくつか表示される可能性があります。これを修正するには、下にスクロールして、銀行から受け取ったデータで空欄を埋めてください。
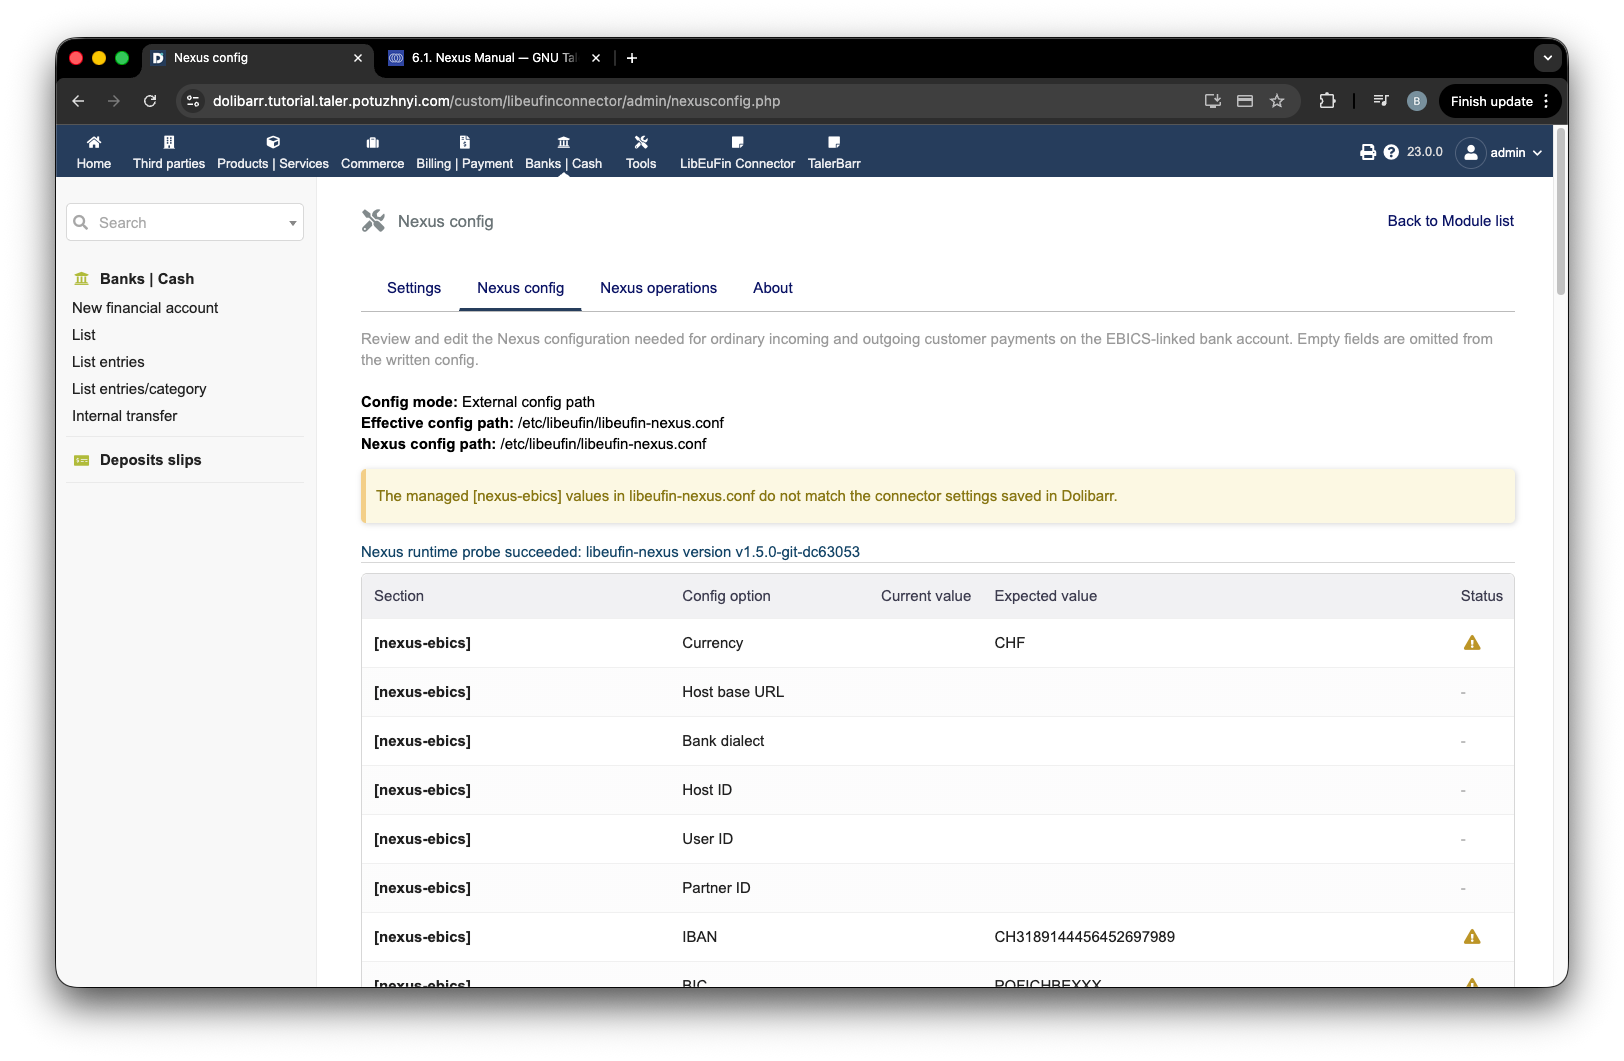
設定不足の警告が表示されたNexus configページ。#
入力されたデータがどのようになるかの例を次の画像に示します。下にスクロールして、**write managed keys to config**を押してください。
注釈
``Failed to write the managed Nexus configuration keys (directory_not_writable)``と表示された場合は、設定部分に戻り、**Use module-owned local config**を緑/trueに切り替えてください。
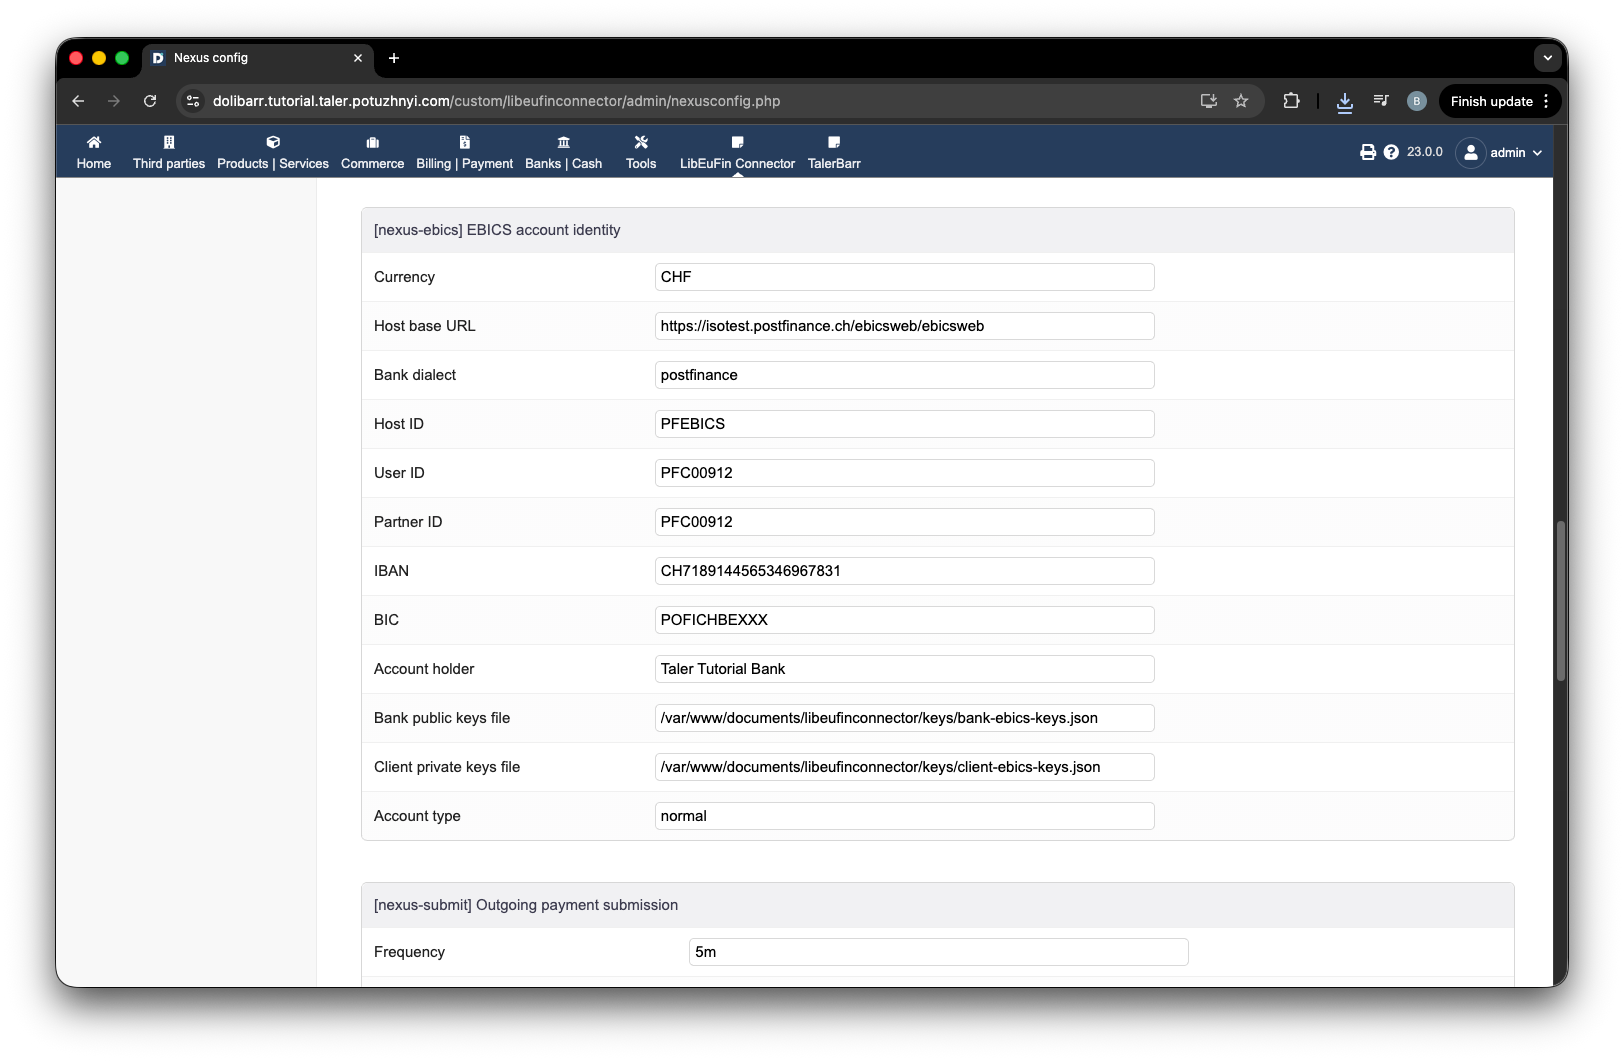
入力済みのNexus config設定フォーム。#
設定が検証され、問題がなければ、ラベル1の領域に黄色いブロックはなくなります。次のような画面が表示されます。
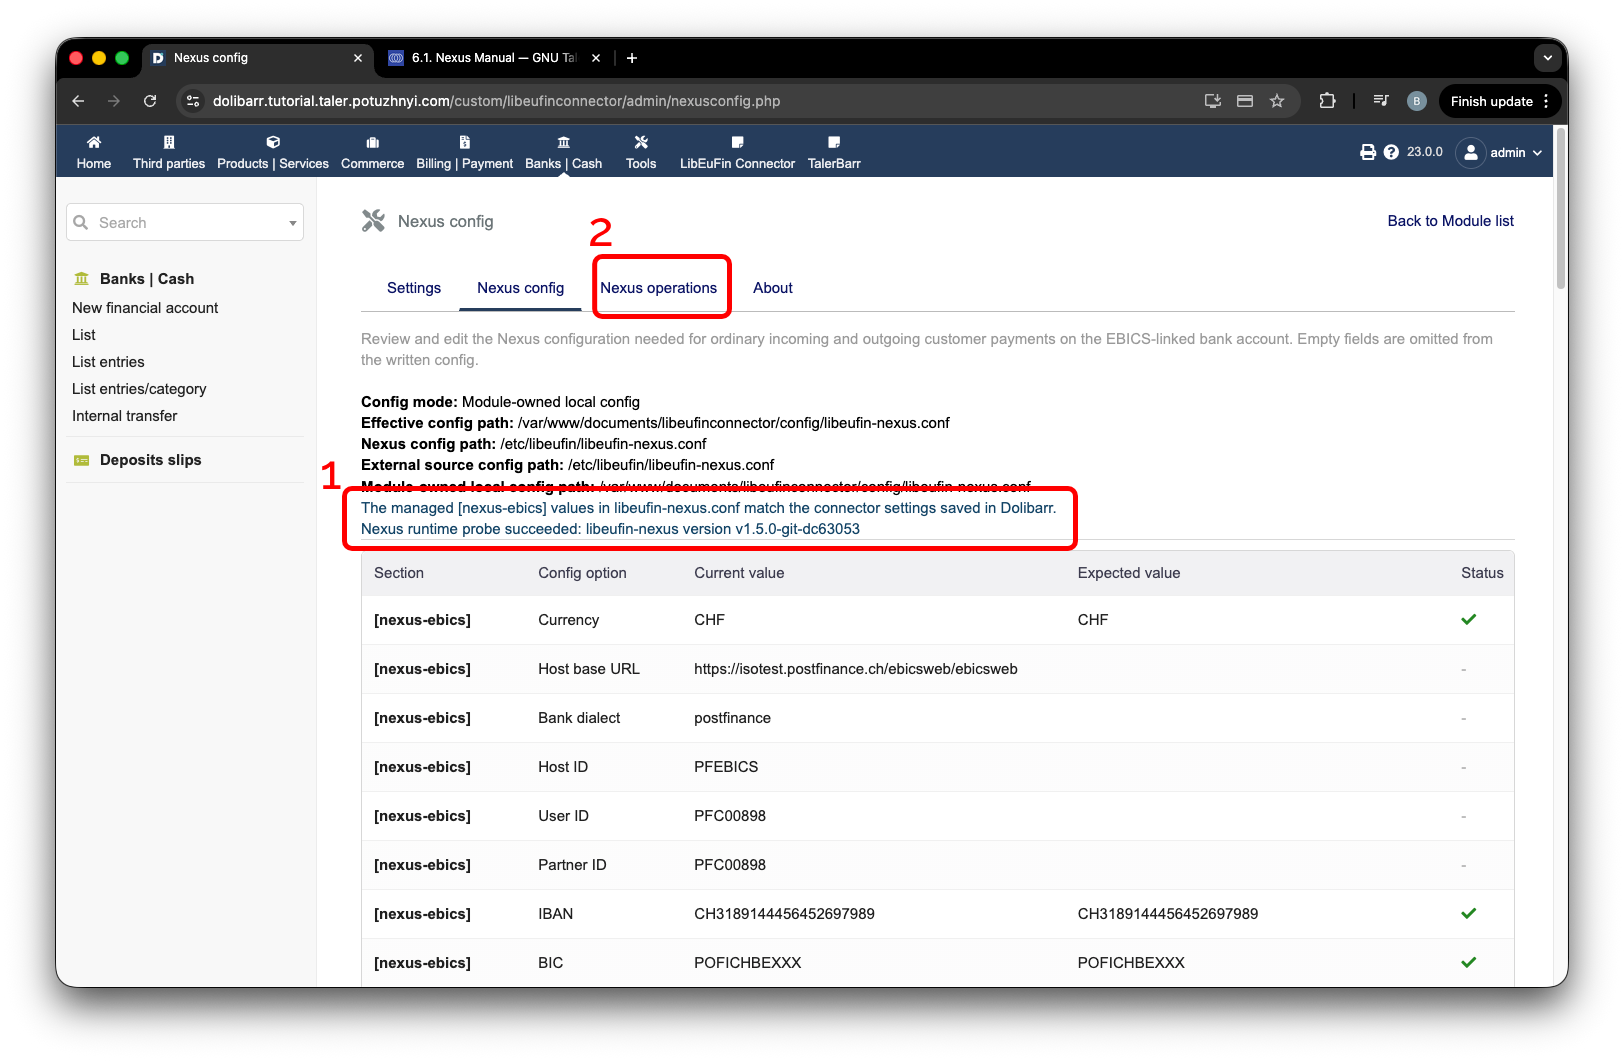
Nexus config設定の検証成功。#
正しい設定ができたら、モジュールを使用するまでに残っている最後の小さなステップは、実際にlibeufin-nexusを起動することです。そのためには、前の画像でラベル2として示されている``Nexus operations``に移動してください。
2.4.2.5. libeufin-nexusを起動する#
これは少しトリッキーですが、手順自体は非常にシンプルです。次の手順を行います:
Nexusデータベースを初期化します。
銀行に保存された鍵がないことを確認します。
``Ebics setup``を実行します。鍵を生成して銀行に送信しますが、もちろんEBICSデータが正しい場合に限り失敗します。
銀行で口座を有効化します。
再度``Ebics setup``を実行します。失敗しますが、それまでのすべてが正しく行われていれば、鍵を承認するための新しいボタンが表示されます。
鍵を承認することで、セットアップが完了します。
もう少し図解した形で説明すると:
これ以上の手順を進める前に、銀行が以前保存した鍵を一切持っていないことを確認してください。もし持っている場合は、続行する前に銀行に依頼して削除してもらってください。
PostgreSQLをインストールしていない場合、またはデータベースを作成していない場合、あるいはユーザーを作成していない場合、モジュールは次の画像のラベル1のように黄色い注記でこれを知らせます。ラベル2をクリックすると、ログと考えられる解決手順が表示されます。黄色いボックスが表示されない場合は、そのままラベル3のボタンを押して進めることができます。これにより、モジュールがlibeufin-nexusデータベースを準備する処理が開始されます。数秒後、10~20秒ほどで、画面を更新できます。すべて問題なければ、実行ステータスが Success と表示されます。この後、ラベル4のボタンを押すことができます。前と同様に、10~20秒後にページを更新できます。
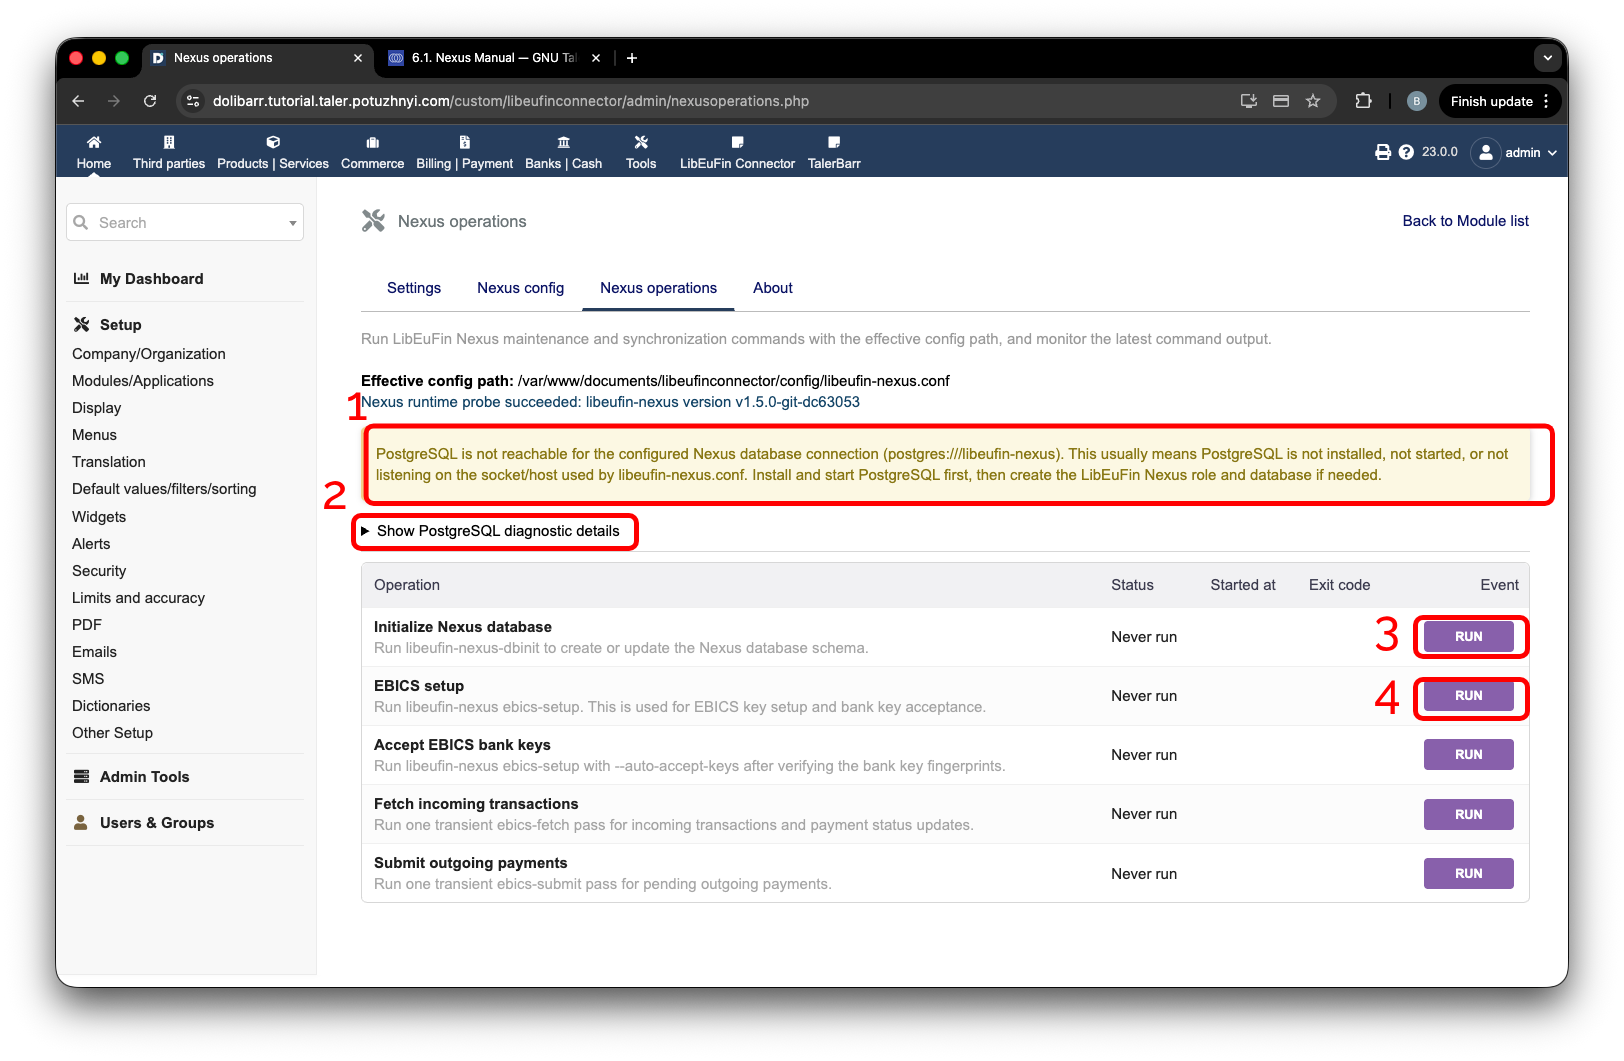
EBICSセットアップ前のNexus操作ページ。#
これまでの手順を正しく実行していれば、次に目にするのは EBICS setup が失敗したという状態です。ラベル1の領域を押すことで、エラーをさらに詳しく調査できます。これにより、ログがドロップダウン表示されます。確認すべきなのはラベル2に示されているようなテキストで、これはつまり銀行へ行ってアカウントの有効化を完了させる必要があるということを意味します。
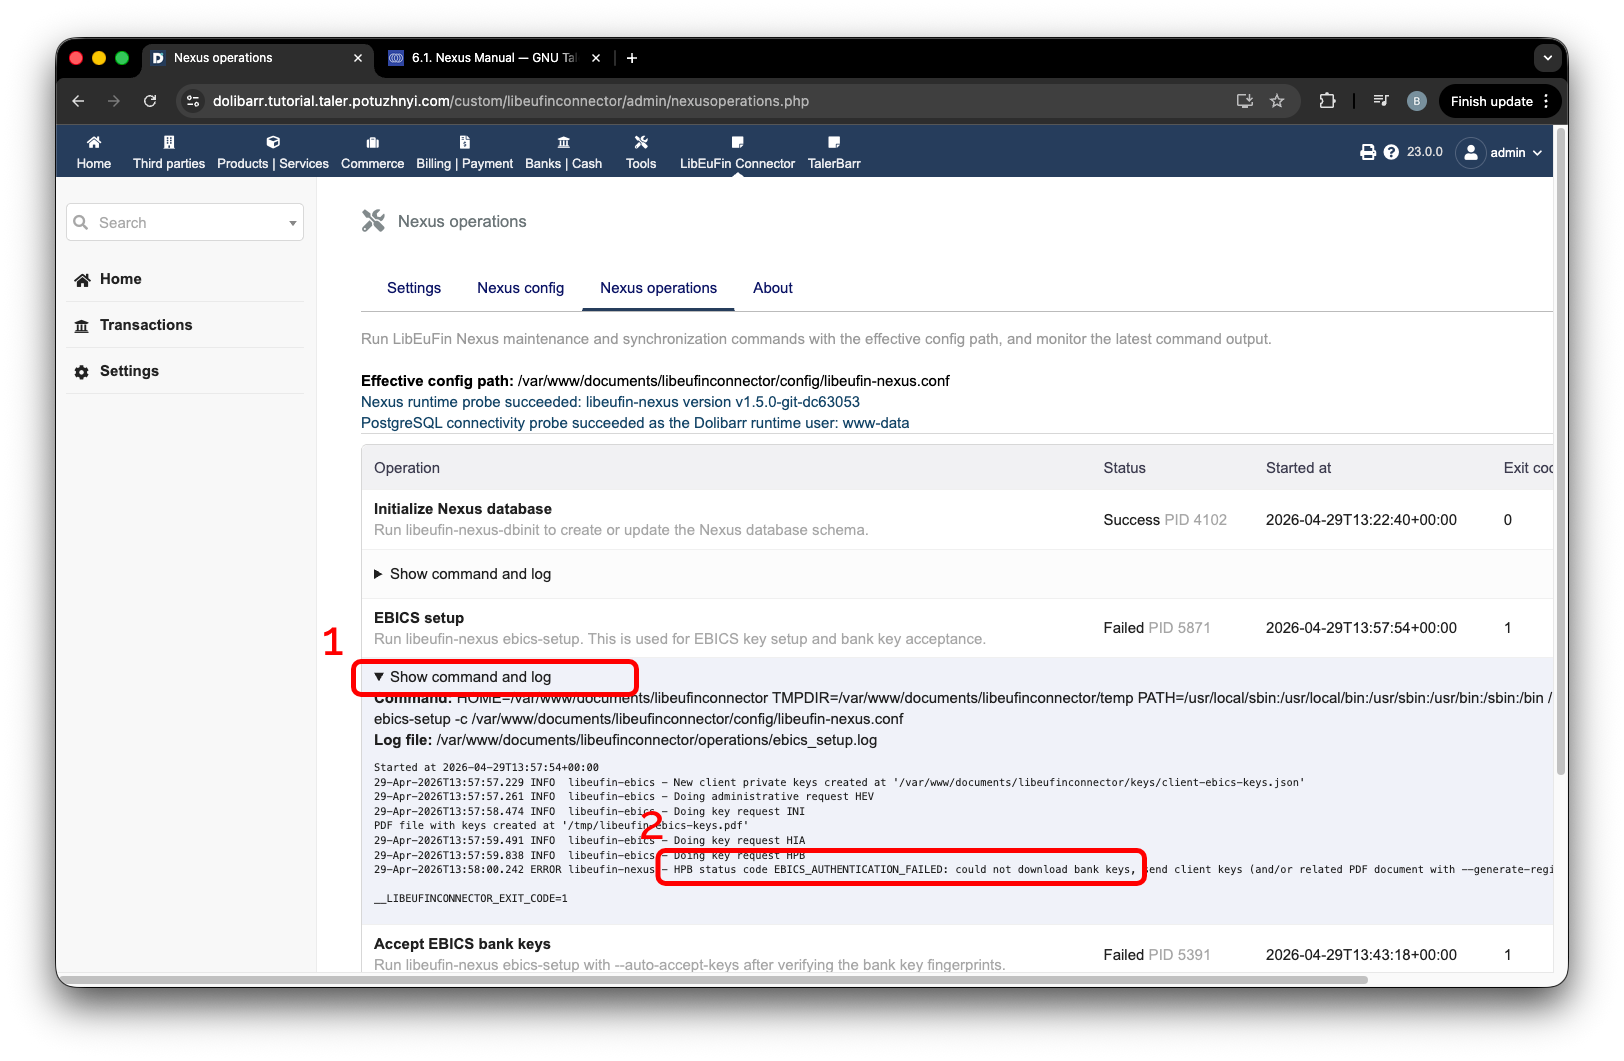
鍵を銀行へ送信した後のEBICSセットアップ失敗。#
アカウントが有効化されたことを銀行から確認できたら、モジュールのページに戻り、もう一度 Run EBICS setup を押します。10~20秒後にページを更新すると、次のページが表示されます。
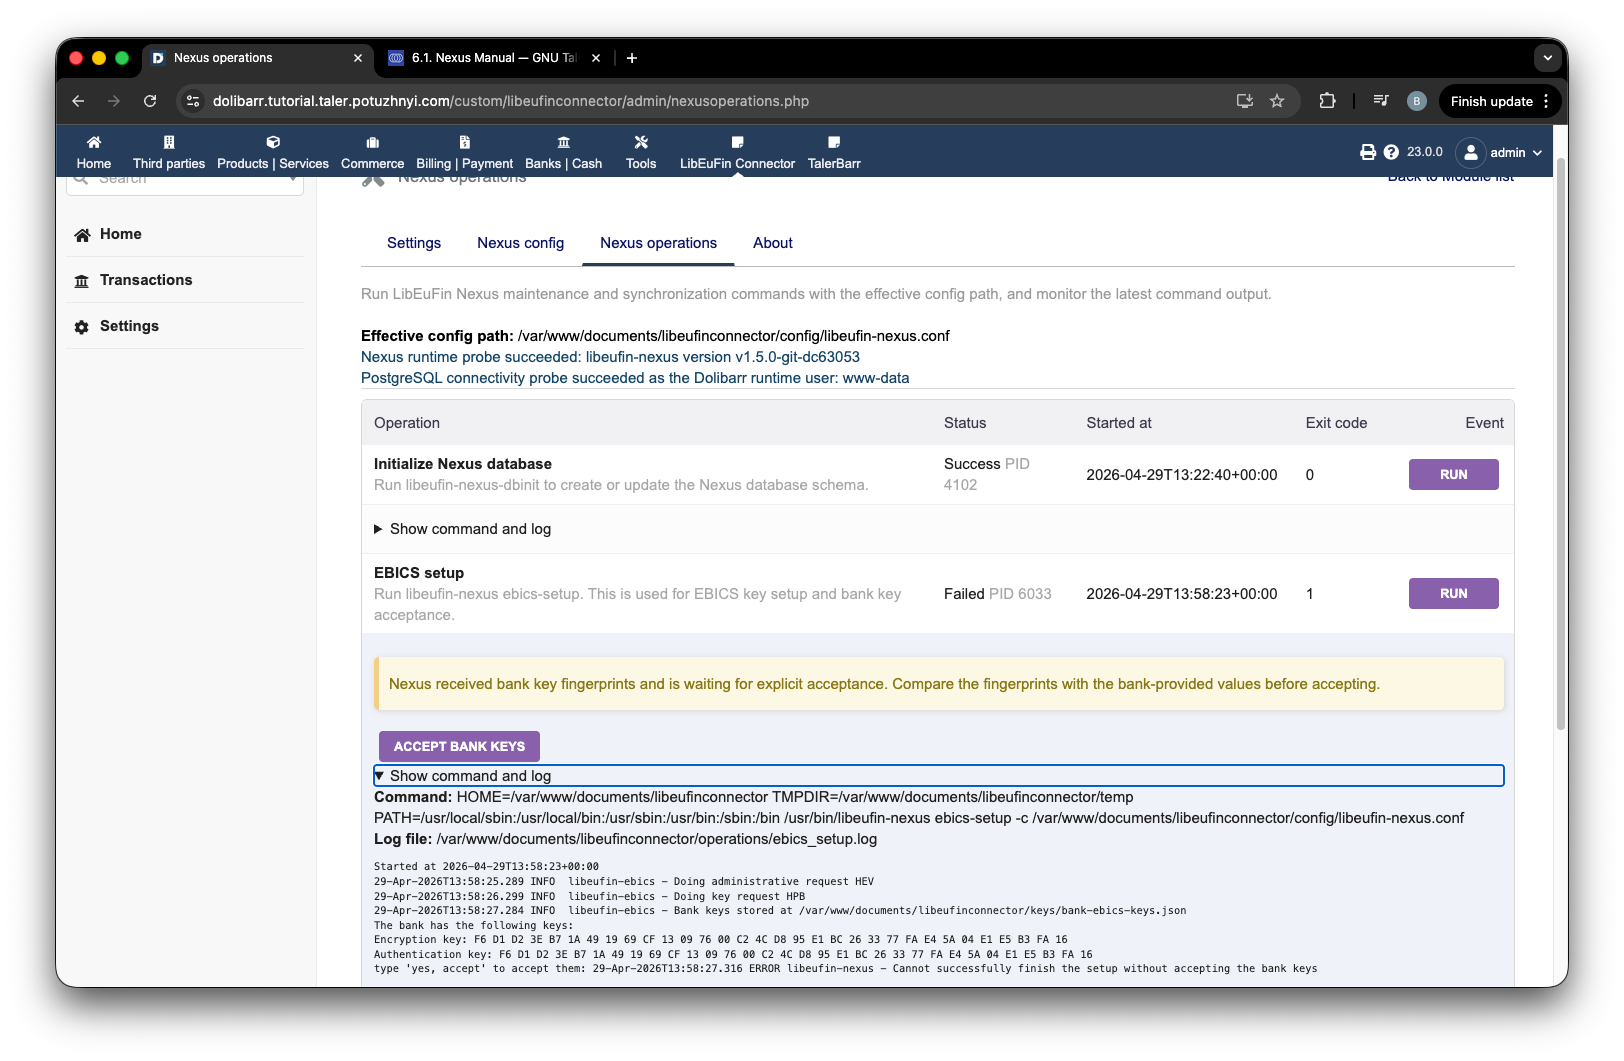
銀行の鍵を承認できる状態のEBICSセットアップページ。#
ここで、銀行から示された鍵と比較し、Accept bank keys を押します。10~20秒後にページを更新してください。これで、Dolibarrがあなたの銀行と通信できるように設定されました。合わせて Fetch incoming transactions と Fetch outgoing payments を実行してもよいでしょう。これらはすべて、次の画面のように成功する必要があります。
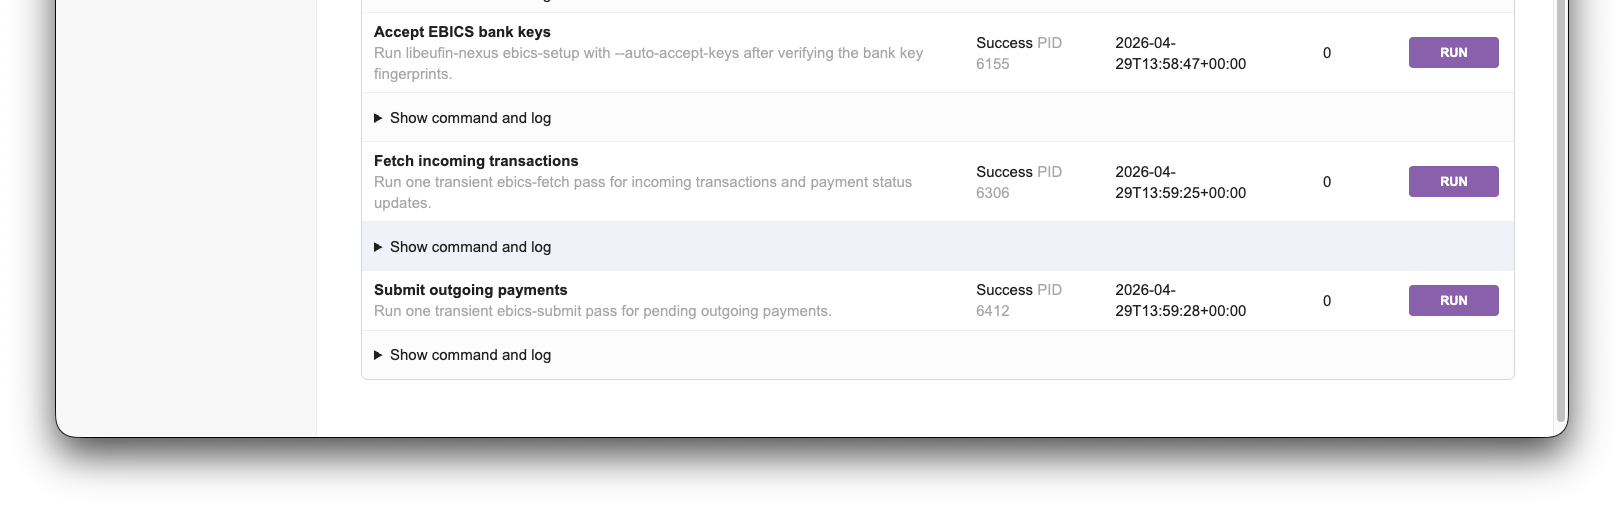
EBICSセットアップ後のNexus操作の成功。#
これで、次の画像に示されているホームページに移動できます。そして改めて、Dolibarr上でlibeufinとLibEuFin Connectorを稼働させたことをお祝いします。
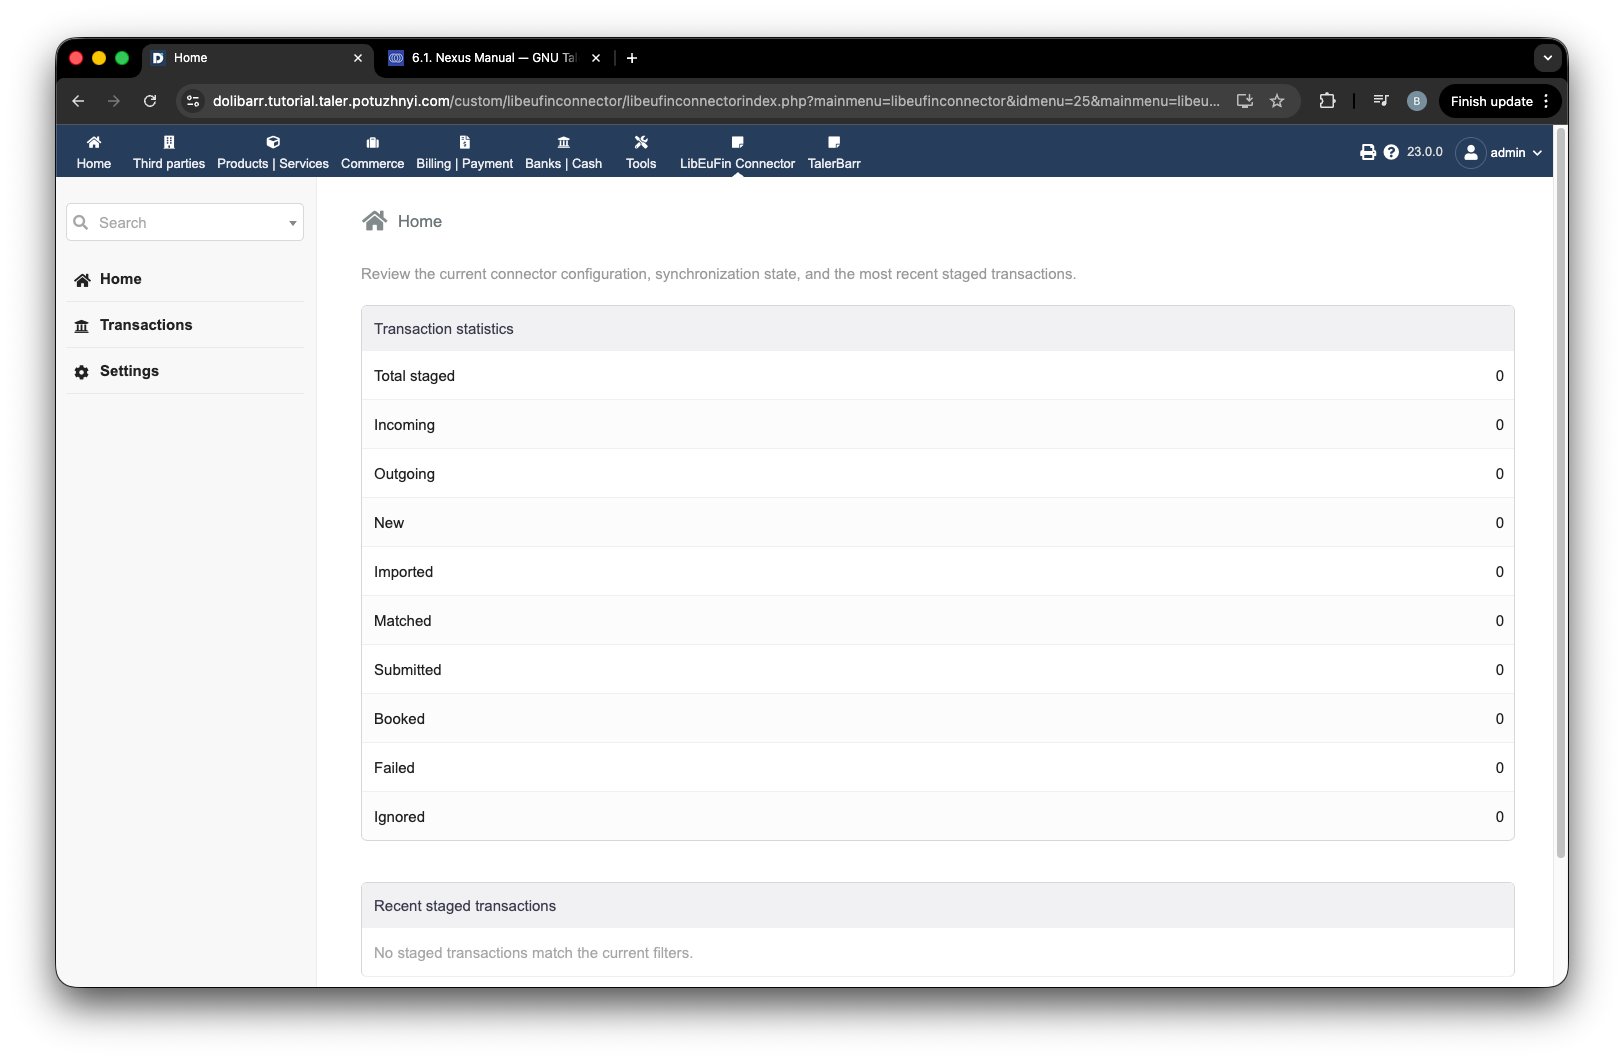
セットアップ成功後のLibEuFin Connectorホームページ。#
2.4.2.6. 次のステップ#
モジュールをインストールして有効化した後は、入金取引 と 出金取引 に進み、このモジュールで入金および出金の支払いがどのように機能するかを確認してください。